Since the first version of the MCTD has been dismantled, I have decided to archive this site and start a new blog describing the planning and construction of my new, basement-sized MCTD.
The new site gives me a little more control and flexibility than this current Blogger.com site, and will serve to compartmentalize the processes for the two layouts.
Thanks for following this blog, and I hope you'll join me at the new one!

The Monument City Terminal Division is an HO Scale model railroad based on Baltimore & Ohio operations in Baltimore, MD during the Chessie System era. This blog documents my process for getting the layout up and running, including musings on design, construction, and operation.
Saturday, August 19, 2017


Thursday, April 20, 2017
Fast Forward...
It has been a very long time since I posted. So long that, while I didn't exactly forget about this blog, I hadn't thought about it in some time.
But progress is being made, and I thought I'd post an update about it. If for no other reason that to see if anyone was still paying attention.
The past five years have been pretty busy. As I mentioned in "Do You See What I See?" I am a member of the Worcester Model Railroaders (link to the right). And for three of those years, I was club president. Pretty much all of my modeling efforts and a good chunk of "administrative time" for the past few years have gone to the WMRR.
Thursday, May 24, 2012
Do You See What I See?
I’m on the train for a business trip, so it seemed fitting
to finally update you guys on the latest at the MCTD.
So I spend a lot of time just staring at the layout.
I’m Visualizing As Fast as I Can
I’m a slow modeler. (Hey! I hear you, y'know! I hear you guys saying, “Yeah, you’re a slow blogger, too.”) I admire the modelers who can just jump into a project without a set plan and come out with something great, but that’s not me. This is not to say that I think you have to plan everything out to the nth degree before building anything; quite the contrary in fact. But I have to be able to visualize it. When I build something, especially a structure or scenery, I have to be able to imagine it and see in my mind’s eye how it will fit into the whole. Once I can “see” it, I go to town and usually finish the project relatively quickly.So I spend a lot of time just staring at the layout.
Saturday, March 31, 2012
A Memorable Memorial Day
So what's been going on these many quiet months?
I've been busy.
That’s not an excuse, but a proclamation, and in my opinion, a good one. Well, not for the blog, but for the layout.
It all started before last Memorial Day. We had planned a cookout for our families (a rousing success, I must say), and so I set a deadline for myself. You see, I didn’t want people to ask “How are your trains coming along?” and be forced to once again say “Well, I haven’t done much.”
So I did things.
The Goals
Goal #1 was to have enough track laid and operational to, well, operate. At least a little bit. Keeping in mind that not a single one of the family members attending are model railroaders, operation in this case meant the ability to run a locomotive with some cars on the main track and into some sidings. At the time, I had not yet ordered the large Peco Code 100 wye that I needed to split the track at the north (right) end of Wicomico St., so the main track ended just where the wye should be.
Having taken care of the bus (as described here), I was free to wire up the drops. I managed to complete that in a few hours over two evenings, and I didn’t even burn myself. (An achievement in itself considering my soldering skills.)

Goal #2, as I alluded to at the end of this post, was to get a backdrop up. As the photos attest, I wasn’t quite as successful on this count. (It’ll make a good topic for a later post.) It turned out to be a much bigger job than I had envisioned, and certainly more than a one-man job, so after 8 feet, I gave up. (I will go back to it as some point, but I’ll probably scrap what I have currently. I’m just not happy with it.) At that point I focused on trying to ensure that things ran well.

The Goals
And they did run well. I had more than a few people down to see the layout, and all seemed impressed, even the very young kids. This last point was especially good considering there is no loop on the layout, meaning there was not even a glimmer of the possibility of the roundy-round running kids usually love. (Although I will say the sound-equipped Conrail B23-7 didn’t hurt in keeping their attention.) I was able to deliver and pick up cars. The runaround worked well, and the lone code 83 spur caused no issues.As these things tend to do, the running raised some points. First, it became obvious that I needed some sort of off-layout storage yard, which turned out to be as simple (at least for now) as extending the track the joins the layout. Second it was obvious that I needed to get the wye in. Both of those have been completed, making ops a bit easier.
One major drawback of the unfinished basement is that it’s really (REALLY) cold in the basement in the winter months. So, my progress has been slow this winter (plus I’ve still been working on my portion of the the WMRR club layout as mentioned here). With warmer spring temperatures around the corner, I’m hoping to get moving again. More on the slow progress I’ve made in the next post.
Until then!
Monday, January 30, 2012
Time Flies!
I just looked at the blog and realized nine months have gone by since my last post. What a slacker! (What scares me even more is how quickly those nine months went by.)
So, just to give a quick status, while the blog hasn't been updated, the layout has. Not a ton, but some. (You see, I also belong to the Worcester Model Railroaders, and have a pretty significant street running project going there, too. So that's been seeing a lot of my modeling cycles.)
At any rate, I've laid all the track, gotten it wired, and have done a few impromptu solo op sessions along the way. Tired of losing a few feet of track every time I wanted to set up a train, I also built a (somewhat rickety) staging addition that goes on the left side of the layout.
On the non-ops side, I've been doing some planning on structures, as well, and laid my first bit of scenery!
I'll expand on all this with real posts (and photos) in the weeks to come. Stay tuned!
So, just to give a quick status, while the blog hasn't been updated, the layout has. Not a ton, but some. (You see, I also belong to the Worcester Model Railroaders, and have a pretty significant street running project going there, too. So that's been seeing a lot of my modeling cycles.)
 |
| Just a taste of what's happening on my section of the Worcester Central Lines layout at my club. But that's another blog! |
At any rate, I've laid all the track, gotten it wired, and have done a few impromptu solo op sessions along the way. Tired of losing a few feet of track every time I wanted to set up a train, I also built a (somewhat rickety) staging addition that goes on the left side of the layout.
On the non-ops side, I've been doing some planning on structures, as well, and laid my first bit of scenery!
I'll expand on all this with real posts (and photos) in the weeks to come. Stay tuned!
Thursday, April 21, 2011
The Wicomico St. Bus
Baseball season is tough for me. At least from a modeling standpoint. I love to watch, and somehow, before I know it, 3-4 hours each night have gone somewhere, never to be seen again.
The terrible start of my beloved Red Sox this year has made it easier to not watch. They're off to their worst start in... ever. At least in my lifetime. In fact, the only games they've won are the ones I haven't watched. And being a superstitious baseball fan (and a superstitious Red Sox fan to boot) that clearly means I can't watch any more Sox games this season at all. (Because obviously the success of a team with a $150 million payroll rests squarely on my shoulders.)
That's not going to happen of course, I'm not that strong. But for now it's certainly a boon to my modeling time.
What the heck does this have to do with Wicomico St. or busses, you ask? Well, it's my long-winded way of saying I got something done on the layout last night.
With a burst of enthusiasm I slid under the layout and drilled holes through the leg anchors. I had decided that I would use brass hooks to keep the wiring neat, that is, to keep it from sagging once the drops are connected to it, since the suitcase connectors will have a little weight. Once I'd pulled the wire through, I determined the hook locations and put them in. This was a ridiculously simple task since the roadbed is thin luaun plywood on a hollow door.
The tougher part is next: soldering drops. As I think about it, soldering is the part of wiring that I really dislike, (not to mention I'm not that good at it), so my avoidance mechanism may kick in once again, but I'm going to try to keep my enthusiasm up and get the task completed very soon.
I'll update you on that one next time...
The terrible start of my beloved Red Sox this year has made it easier to not watch. They're off to their worst start in... ever. At least in my lifetime. In fact, the only games they've won are the ones I haven't watched. And being a superstitious baseball fan (and a superstitious Red Sox fan to boot) that clearly means I can't watch any more Sox games this season at all. (Because obviously the success of a team with a $150 million payroll rests squarely on my shoulders.)
That's not going to happen of course, I'm not that strong. But for now it's certainly a boon to my modeling time.
What the heck does this have to do with Wicomico St. or busses, you ask? Well, it's my long-winded way of saying I got something done on the layout last night.
The Bus
Last night I dragged my butt downstairs, then dragged some wire. Given that the layout is only 17 feet long, this may not seem much of an achievement, but I've been avoiding it, so it is. Let's be clear: The wiring on this layout is not hard. I just don't like doing wiring at all, ever, so I'd been putting it off.With a burst of enthusiasm I slid under the layout and drilled holes through the leg anchors. I had decided that I would use brass hooks to keep the wiring neat, that is, to keep it from sagging once the drops are connected to it, since the suitcase connectors will have a little weight. Once I'd pulled the wire through, I determined the hook locations and put them in. This was a ridiculously simple task since the roadbed is thin luaun plywood on a hollow door.
The LocoNet
Once the wiring was hung I realized I hadn't considered the LocoNet, (I'm using Digitrax) but I quickly decided I wasn't worried. Again, the layout is only 17 feet long, and I would only need a UR91 and a single UP3. (Yes, I know these are outdated, but I have them and they work.) I had saved the wire from the old layout, so I have all the LocoNet wiring I need for now. A couple of additional hooks will take care of keeping that wire out of the way. Then I hung the UR91 and UP3.Running with DCC
Did I run a train? Alas no. I realized that I don't have a 1/8" drill bit long enough to go through a ceiling tile or two, two inches of foam and a hollow core door, so I couldn't install and drop wires. I decided to I would pick up a bit today; then I called it a night. It was a productive hour. It's amazing how little time it often takes to do the things you spent so much time avoiding.The tougher part is next: soldering drops. As I think about it, soldering is the part of wiring that I really dislike, (not to mention I'm not that good at it), so my avoidance mechanism may kick in once again, but I'm going to try to keep my enthusiasm up and get the task completed very soon.
I'll update you on that one next time...
Sunday, March 6, 2011
Sunday, January 16, 2011
Good News and Bad News
Hello everyone!
I haven't posted in a while, so I thought at the very least, I would give you a little news. Both Good and Bad.
Well, part of the bad news you already know: I haven't been able to post for a while. I've been very busy with various work projects since early November. As a consultant and small business owner a) you don't necessarily keep 9-5 hours b) you take work when it's available and make the most of it. So, that's kept me from posting as much as I'd like. That is, at all.
I haven't posted in a while, so I thought at the very least, I would give you a little news. Both Good and Bad.
The Bad News
Well, part of the bad news you already know: I haven't been able to post for a while. I've been very busy with various work projects since early November. As a consultant and small business owner a) you don't necessarily keep 9-5 hours b) you take work when it's available and make the most of it. So, that's kept me from posting as much as I'd like. That is, at all.
Tuesday, November 2, 2010
Breaking Ground
It's been a while since I posted, and the reason for that is that I was getting all my materials together to start construction. The major holdup was the ceiling tiles.
Like Jim Six in Model Railroad Planning 2010, I'm using ceiling tiles for my roadbed. However, I don't need pristine tiles (I'm just going to shave them down and cover them with paint anyway) so why would I want to pay full price for them? I asked at the local Lowe's what they do with damaged tiles, and the guys said they sell them for pennies on the dollar. So I waited, checking the clearance bin each time I went in. About a week or so ago, there were 5 cases sitting there in various level of distress. One case had only one tile in the package that was damaged minimally; the rest were perfect. I got them for 50% off. Not exactly my idea of pennies on the dollar, but certainly cheap enough. I also had to run around looking for the right size T-nuts for the wheels. I wasn't paying $3.50 each for stainless steel, but no one seemed to have the galvanized in stock. I finally located some, still stainless, but appreciably cheaper than Lowe's. I bit the bullet.
Like Jim Six in Model Railroad Planning 2010, I'm using ceiling tiles for my roadbed. However, I don't need pristine tiles (I'm just going to shave them down and cover them with paint anyway) so why would I want to pay full price for them? I asked at the local Lowe's what they do with damaged tiles, and the guys said they sell them for pennies on the dollar. So I waited, checking the clearance bin each time I went in. About a week or so ago, there were 5 cases sitting there in various level of distress. One case had only one tile in the package that was damaged minimally; the rest were perfect. I got them for 50% off. Not exactly my idea of pennies on the dollar, but certainly cheap enough. I also had to run around looking for the right size T-nuts for the wheels. I wasn't paying $3.50 each for stainless steel, but no one seemed to have the galvanized in stock. I finally located some, still stainless, but appreciably cheaper than Lowe's. I bit the bullet.
Monday, October 11, 2010
Track Plan Unveiled
It's time to break out the champagne and christen the final Wicomico St. Track Plan. Except I don't drink champagne and christening the plan will just make the paper soggy.
Regardless, as many of you know, coming up with a workable track plan can be a pretty difficult thing. That's partly why I put together this blog. as I've found that getting ideas from others can be very helpful. That proved true here.
I'll be honest, though: apart from this initial Wicomico St. portion, I haven't a clue as to how I'm going to put all of the things I want to include in the layout into a workable track plan for the rest of the room. But I'm not worrying about that at the moment. As stated in the "Planning For Portability" section of the Planning and Pondering post, I'm building this portion first so that I don't need to worry about having the whole thing finished.
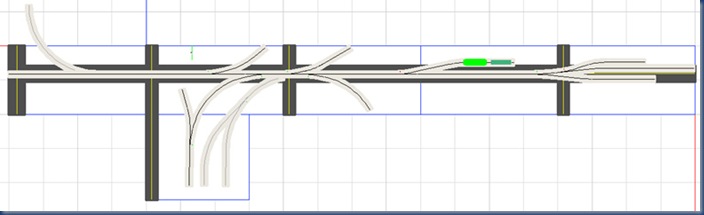
The level of incompletion for the basement plan as a whole doesn't diminish the satisfaction I'm feeling with finalizing the plan. So without further ado, here is the final drawing.
 Now, before you get in an uproar, (I know you were thinking about starting an uproar... I sense these things) I'm aware that a "final" plan is rarely final. And I already know that the layout won't be built exactly as shown here. I plan to shorten some of the Peco turnouts to lengthen the runaround a little bit and move the spurs to the left slightly further left. But anyone who has worked with 3rd Planit knows, it's a lot easier to plan for these things than to redraw a turnout. So, I'm saving myself the work. But, the framework is there, and this is the plan I'm moving forward with.
A note on the operation: trains will enter the layout from left to right. On the prototype, trains bound for Wicomico come of the main line and connect to the section represented by the layout to the left of the W.T. Burnett area. The track terminates at the end of the street (near the area I've designated "Storage"). So, nothing will ever connect there on the layout.
I want to thank everyone who has given their input and some great ideas to get the plan to this point. I'm looking forward to doing some building. And when we return, thoughts on building...
Regardless, as many of you know, coming up with a workable track plan can be a pretty difficult thing. That's partly why I put together this blog. as I've found that getting ideas from others can be very helpful. That proved true here.
I'll be honest, though: apart from this initial Wicomico St. portion, I haven't a clue as to how I'm going to put all of the things I want to include in the layout into a workable track plan for the rest of the room. But I'm not worrying about that at the moment. As stated in the "Planning For Portability" section of the Planning and Pondering post, I'm building this portion first so that I don't need to worry about having the whole thing finished.
The level of incompletion for the basement plan as a whole doesn't diminish the satisfaction I'm feeling with finalizing the plan. So without further ado, here is the final drawing.


A note on the operation: trains will enter the layout from left to right. On the prototype, trains bound for Wicomico come of the main line and connect to the section represented by the layout to the left of the W.T. Burnett area. The track terminates at the end of the street (near the area I've designated "Storage"). So, nothing will ever connect there on the layout.
I want to thank everyone who has given their input and some great ideas to get the plan to this point. I'm looking forward to doing some building. And when we return, thoughts on building...
Thursday, October 7, 2010
Planning and pondering
In "Why Would We Want Wicomico", I talked about the first draft of the layout design for the MCTD. As a refresher, here was the original design of the Wicomico St. portion of the layout:
But like I said, I couldn't leave well enough alone. In the "What's In A Name" post, I mentioned that I decided on proto-freelancing so that I could , well, basically, still do whatever the heck I want. And here I saw some problems and opportunities.
After living with this plan a while, my thoughts came around to:
As you can see at the right, my basement is not finished yet. In fact, it's not even really organized yet. Okay, it's a disaster! In this shot you can't even see the stack of railroad-related boxes waiting to be opened, like Christmas. At any rate, I have a long-term project in front of me to get the pipes moved, walls framed, electricity run, drywall added, and a drop ceiling installed. But, having already been layout-less for quite some time, I don't want to wait around until the room is completely ready before I start to build something. Read: I still want to play while I finish the room.
My plan, therefore, is to make the Wicomico St. project portable. Since there will be room construction going on at or around the same time as layout construction, I decided to put the whole thing on wheels so I can move it around as needed. And trying to wheel around a 20-foot-long behemoth around in a basement with lolly columns isn't convenient. I decided smaller would be better.
Instead of the five 2' x 4' dominoes I originally intended to use, I decided to build the layout on two hollow core doors and only a single 2' x 4' domino I had left over from the layout (such as it was) at the old house. Two inches of extruded foam will be put on top of that, then ceiling tiles as the subroadbed, a la Jim Six in Model Railroad Planning 2010. The combination will be sturdy, quick and clean to install, and allow me to include the minor elevation change on the prototype without the worry of open grid or L-girder benchwork.
Before I go into them, let's overlay the map with some building guide and some labels.


The new plan basically fits on the two doors with the extra domino. But there's still a problem. I don't know where to put the runaround. The most natural place is where the elevation change should be, and I'd really like to include it if at all possible. So, I'm going to open it up. What do you think? Where should I put the runaround? I'm thinking I'll need to run around 3-4 50 foot cars, so I need a couple of feet. Leave your suggestions in the comments.

But like I said, I couldn't leave well enough alone. In the "What's In A Name" post, I mentioned that I decided on proto-freelancing so that I could , well, basically, still do whatever the heck I want. And here I saw some problems and opportunities.
After living with this plan a while, my thoughts came around to:
- At 20 feet, the module was longer than I really wanted.
- As someone correctly pointed out, there is no runaround to get the the locomotive properly oriented to serve all the industries easily (although the prototype seems to have faced the same issue).
- If we assume that the operator will be standing on the bottom side of the layout, the spur that goes inside the building at DS Pipe and Supply (Spur G in the picture below) would be difficult to access, especially if I build the building close to its prototype design.
- I have no idea what the spur at the far left went to.
Planning for Portability
 |
| My unfinished basement. A.k.a. "The Disaster" |
As you can see at the right, my basement is not finished yet. In fact, it's not even really organized yet. Okay, it's a disaster! In this shot you can't even see the stack of railroad-related boxes waiting to be opened, like Christmas. At any rate, I have a long-term project in front of me to get the pipes moved, walls framed, electricity run, drywall added, and a drop ceiling installed. But, having already been layout-less for quite some time, I don't want to wait around until the room is completely ready before I start to build something. Read: I still want to play while I finish the room.
My plan, therefore, is to make the Wicomico St. project portable. Since there will be room construction going on at or around the same time as layout construction, I decided to put the whole thing on wheels so I can move it around as needed. And trying to wheel around a 20-foot-long behemoth around in a basement with lolly columns isn't convenient. I decided smaller would be better.
Instead of the five 2' x 4' dominoes I originally intended to use, I decided to build the layout on two hollow core doors and only a single 2' x 4' domino I had left over from the layout (such as it was) at the old house. Two inches of extruded foam will be put on top of that, then ceiling tiles as the subroadbed, a la Jim Six in Model Railroad Planning 2010. The combination will be sturdy, quick and clean to install, and allow me to include the minor elevation change on the prototype without the worry of open grid or L-girder benchwork.
Modifications for Operations
In order to shrink the module down to the size I wanted, I needed to make some changes.Before I go into them, let's overlay the map with some building guide and some labels.

- Spur A, while visible from above, is not shown on the 1989 Roadway map, and it just seems to run into a parking lot. Since it's so far down on the left, I decided to cut it, an obvious 4 foot savings.
- If you stand on Wicomico St. today, Where Spur B ran off there is now a Waste Management facility. Again, nothing on the Roadway map.
- Spur C has been covered over by new construction, but again, (are you sensing the pattern yet?) there was no operation there in the Roadway Maps that I have, so I decided to cut both B & C in the interest of space. More on the space issue in a second.
- I don't want to be having to reach over anything too tall at the front of the layout to couple and uncouple cars. So it became obvious that I needed to make the buildings at the front short to make access better. However, DS Pipe (Spur G) is a really interesting building that I wanted to model, (how many industrial buildings do you find in the middle of the city with a ramp and parking lot on the roof?) not to mention it had a spur into the building, so I decided to relocate it to the behind the track, and the location where Spurs B & C were on the original plan seemed to be the right place.
The New Plan
Given all that, here's the modified plan:
The new plan basically fits on the two doors with the extra domino. But there's still a problem. I don't know where to put the runaround. The most natural place is where the elevation change should be, and I'd really like to include it if at all possible. So, I'm going to open it up. What do you think? Where should I put the runaround? I'm thinking I'll need to run around 3-4 50 foot cars, so I need a couple of feet. Leave your suggestions in the comments.
Monday, September 27, 2010
What’s in a name?
The Monument City Terminal Division. That’s the name of my layout. I can understand if you have questions as to why; it’s not exactly what I would call an intuitive name for a Chessie System-based layout modeled after Baltimore.
But it does make sense. Mostly. If you have some background info. Let’s see if breaking it down helps you understand better…
A definite article that indicates that its noun is a particular one identifiable to the listener or to refer to objects we regard as unique.
(I included that one for the grammar geeks out there. And I know you’re out there…)
I decided early that while I wanted the layout to represent Baltimore, I did not want to be tied down to faithfully replicating each detail. I wanted the license to change things as I saw fit. Prototype-based freelancing. So I decided that I would rename the city and various elements within it. It’s not Baltimore, it’s the flavor of Baltimore. Which is not as good as the flavor of bacon… but what is?
Anyway, for those that have been following along, you’ll know that I discovered Wicomico St. via the B-More Ghosts site. The observant among you will notice that their web address is www.monumentalcity.net, and that is because one of Baltimore’s nicknames is—you guessed it—The Monumental City. A trip to the Baltimore page on Wikipedia uncovers the following:
Someone asked me, after reading my initial post, whether I called it the “Terminal Division” because it was to be my last layout. While I suppose it could be my last layout (building it may kill me—alternately Laura will kill me if I don’t build it), I’m not saying that definitively.
No, I called it that for a very different reason.
First, various railroads have “Terminals,” “Terminal Division”s or “Terminal Subdivision”s. They tend to be areas where a line ends or where there is a lot of switching to be done, as is the plan on the MCTD.
Second, the Baltimore & Ohio (and later CSX) called the area the “Baltimore Terminal.” In fact, the roadway book that I used to create the Wicomico St. plan covers the Baltimore Terminal circa 1989. This subdivision basically includes the entire city of Baltimore and some of its outskirts. To this day, CSX has a Baltimore Terminal Subdivision.
So you replace Baltimore—which I’ve cleverly pseudonymed “Monument City”—and you can pretty easily make the jump to “Monument City Terminal Subdivision.” (For you aforementioned grammar geeks, no, “pseudonymed” is not a word.)
Which begs the question: why is mine the “Monument City Terminal Division” (minus the “sub”)? I’ll give you a hint. It’s a little like item 1 above.
And because I can.
But it does make sense. Mostly. If you have some background info. Let’s see if breaking it down helps you understand better…
“The”
A definite article that indicates that its noun is a particular one identifiable to the listener or to refer to objects we regard as unique.(I included that one for the grammar geeks out there. And I know you’re out there…)
“Monument City”
I decided early that while I wanted the layout to represent Baltimore, I did not want to be tied down to faithfully replicating each detail. I wanted the license to change things as I saw fit. Prototype-based freelancing. So I decided that I would rename the city and various elements within it. It’s not Baltimore, it’s the flavor of Baltimore. Which is not as good as the flavor of bacon… but what is?Anyway, for those that have been following along, you’ll know that I discovered Wicomico St. via the B-More Ghosts site. The observant among you will notice that their web address is www.monumentalcity.net, and that is because one of Baltimore’s nicknames is—you guessed it—The Monumental City. A trip to the Baltimore page on Wikipedia uncovers the following:
Baltimore acquired its moniker, "The Monumental City" after an 1827 visit to Baltimore by President John Quincy Adams. At an evening function Adams gave the following toast: "Baltimore: the Monumental City—May the days of her safety be as prosperous and happy, as the days of her dangers have been trying and triumphant."Those observant folks I mentioned before will also probably have noticed that they call it the “Monumental City” while I use “Monument City.” There are reasons for that. Really. And here they are:
- I thought “Monumental City” didn’t roll off the tongue as well.
- Since no one but me—and now you, enlightened readers—are going to know what the reference is anyway, I could get away with it.
- Truth be told, when I decided on the name, I hadn’t looked the the B-More Ghosts site for quite some time, and I actually misremembered the name as “Monument City.” By the time I realized my gaffe, I liked the name the way I had it. After considering it, <refer to item 1>.
“Terminal Division”
Someone asked me, after reading my initial post, whether I called it the “Terminal Division” because it was to be my last layout. While I suppose it could be my last layout (building it may kill me—alternately Laura will kill me if I don’t build it), I’m not saying that definitively.No, I called it that for a very different reason.
First, various railroads have “Terminals,” “Terminal Division”s or “Terminal Subdivision”s. They tend to be areas where a line ends or where there is a lot of switching to be done, as is the plan on the MCTD.
Second, the Baltimore & Ohio (and later CSX) called the area the “Baltimore Terminal.” In fact, the roadway book that I used to create the Wicomico St. plan covers the Baltimore Terminal circa 1989. This subdivision basically includes the entire city of Baltimore and some of its outskirts. To this day, CSX has a Baltimore Terminal Subdivision.
So you replace Baltimore—which I’ve cleverly pseudonymed “Monument City”—and you can pretty easily make the jump to “Monument City Terminal Subdivision.” (For you aforementioned grammar geeks, no, “pseudonymed” is not a word.)
Which begs the question: why is mine the “Monument City Terminal Division” (minus the “sub”)? I’ll give you a hint. It’s a little like item 1 above.
And because I can.
Saturday, September 25, 2010
Why would we want Wicomico? (Whew!)
After Announcing this blog to a number of my friends, the first thing I heard back was, “Where’s the track plan?” Well, here it is. Sort of. In a minute. But first I think you need to know why I chose this spot.
Wicomico Street is located in Baltimore, MD, on the west side of the Inner Harbor. These days, it's a stone's throw from Oriole Park at Camden Yards and M&T Stadium where the Baltimore Ravens play. Today, it's still a fairly busy industrial area with this mysterious, unused railroad track embedded in the middle of the road. In 1984, though, it was still an active switching area for the B&O (operating under the auspices of the Chessie System).
There's a bit of a chicken and egg thing going on here. I'm fuzzy about whether I stumbled upon the B-More Ghosts "Street Trackage Survivors" page first and that piqued my interest, or if I saw Pentrex' Street Running video first and then went looking for suitable B&O candidates, stumbling across Wicomico in the process. In any case, I was hooked on the concept and I decided very quickly that street running was something I wanted to do on my layout.
The B-More Ghosts site showed only two pictures of Wicomico St. This one and this one. It wasn’t much to go on, but enough to get me excited. But thankfully, there's Google Maps (and now Bing bird's-eye view). From there I could make out that there was still lots of track left in the street. For example, as you can see in Figure 1, which shows Ellicott Engineering, there is still a ton of track in the asphalt, even to this day. (You can see this view yourself here.) It made it very easy to figure out the layout and that this was once a pretty active area.
Street running? Check.
I pored over the Google aerial photos for a long time. And that was great. But while I thought it was a neat area, I still had no idea what any of the industries were and what they might possibly ship and receive. Then the B&O Historical Society came to the rescue. I purchased from them a book called Baltimore Division Roadway Maps II (B&O H.S. Item number 71002 for anyone who is interested). I can't tell you how invaluable this book has been. As you can see in Figure 2, it shows the industry names, their layout (as of the late 80s) and in some cases how many spots they had for loads. This went a long way towards getting a workable plan on paper.
So I liked its operating potential. Another thing I liked about it was that it was compact, and therefore buildable; a good starter project. A bonus is that it happens to be right in the middle of a lot of railroading in the city, so when it comes time to expand, there are many options.
And there was one other thing about it I liked: saying Wicomico. It’s fun. Wicomico. Wicomico. Wicomico. Try it.
So now we get to the plan (“Finally!” I can hear some of you saying). As mentioned in the Givens and Druthers, I wanted to model the area as a Layout Design Element, to steal a term from Tony Koester. In essence a selectively compressed version of the real thing, with the benefit being that you can be assured it will operate correctly because the prototype operated it. I realized that it laid out very nicely into five 2x4 tables, with each table being a block. I added back some trackage that’s visible in the aerial (and in person) but no longer shown as active in the roadway map. Here is what I ended up with. And it was good.
Compare it to the map. I think I covered the bases. This plan would allow me to add staging at the left end (which is where the track connected to the main), and have a decent operating run.
But like God with Adam before Eve, I couldn’t leave well enough alone, as we’ll discuss later.
Wicomico Street is located in Baltimore, MD, on the west side of the Inner Harbor. These days, it's a stone's throw from Oriole Park at Camden Yards and M&T Stadium where the Baltimore Ravens play. Today, it's still a fairly busy industrial area with this mysterious, unused railroad track embedded in the middle of the road. In 1984, though, it was still an active switching area for the B&O (operating under the auspices of the Chessie System).
There's a bit of a chicken and egg thing going on here. I'm fuzzy about whether I stumbled upon the B-More Ghosts "Street Trackage Survivors" page first and that piqued my interest, or if I saw Pentrex' Street Running video first and then went looking for suitable B&O candidates, stumbling across Wicomico in the process. In any case, I was hooked on the concept and I decided very quickly that street running was something I wanted to do on my layout.
The B-More Ghosts site showed only two pictures of Wicomico St. This one and this one. It wasn’t much to go on, but enough to get me excited. But thankfully, there's Google Maps (and now Bing bird's-eye view). From there I could make out that there was still lots of track left in the street. For example, as you can see in Figure 1, which shows Ellicott Engineering, there is still a ton of track in the asphalt, even to this day. (You can see this view yourself here.) It made it very easy to figure out the layout and that this was once a pretty active area.


 |
| Figure 1: The arrows clearly show still-extant track embedded in the pavement coming off of Wicomico St. into Ellicott Engineering. (Click image to enlarge.) |

 |
| Figure 2: Wicomico Street map from Baltimore Division Roadway Maps II. (Click image to enlarge.) |
So I liked its operating potential. Another thing I liked about it was that it was compact, and therefore buildable; a good starter project. A bonus is that it happens to be right in the middle of a lot of railroading in the city, so when it comes time to expand, there are many options.
And there was one other thing about it I liked: saying Wicomico. It’s fun. Wicomico. Wicomico. Wicomico. Try it.
So now we get to the plan (“Finally!” I can hear some of you saying). As mentioned in the Givens and Druthers, I wanted to model the area as a Layout Design Element, to steal a term from Tony Koester. In essence a selectively compressed version of the real thing, with the benefit being that you can be assured it will operate correctly because the prototype operated it. I realized that it laid out very nicely into five 2x4 tables, with each table being a block. I added back some trackage that’s visible in the aerial (and in person) but no longer shown as active in the roadway map. Here is what I ended up with. And it was good.
Compare it to the map. I think I covered the bases. This plan would allow me to add staging at the left end (which is where the track connected to the main), and have a decent operating run.
But like God with Adam before Eve, I couldn’t leave well enough alone, as we’ll discuss later.
All new! Living "Givens and Druthers" Page
I've added a page especially for Givens and Druthers. As these things can change (and I remember more, either on my own or with help from posters) this page will always have the latest and greatest list. A living document, if you will.
Comments and suggestions always welcome.
Joe
Comments and suggestions always welcome.
Joe
Friday, September 10, 2010
Welcome to the MCTD!
Hello everyone, and welcome to my blog for the Monument City Terminal Division.
With a new house and an empty basement, it's time to start working on a layout. Over the last thirteen years as a member of the Worcester Model Railroaders, I've learned that my operational interests lean towards switching. I'm definitely not a fan of "railfan" style operations (which we operation snobs at the club refer to as "running round-and-round"). While I can appreciate the draw of watching a nicely-modeled train running through a well-constructed scene, it simply doesn't hold my attention for long. Switching, however, is like a 3D logic puzzle for me. And it can change. You can make it easier or harder depending on your mood. I like that.When I first got back into model railroading in my 20s, I had decided to create a freelanced road. Over time, I rediscovered my love of the Chessie System, with a focus on the Baltimore & Ohio, and the freelancing took a back seat. Along the way, I determined that the city of Baltimore embodied so much of what I wanted to replicated in model form. As such, I've decided to make that the focus of the layout.
After some thought, here's where I think I'm heading and what I'd like to see:
Givens and Druthers
My "Givens and Druthers" list includes the following (subject to modification or editing--but unlikely to face wholesale changes--at any time).
Givens
- Industrial Theme heavy on switching
- Based on B&O operations in Baltimore, MD
- Chessie System era (Specifically July 1984)
- Proto-freelanced, replicating some features of Baltimore relatively faithfully, while other features are an attempt to capture the flavor of the area.
- 30" minimum radius (mainline)
24" minimum radius (industrial) - Maximum Grade: 2%
- Point-to-point operation
- Continuous running option for breaking in locomotives and open houses
- Coal branch to have a place to use some of the Craftsman-style kits that I've been acquiring over the last couple years.
- Street running
- LDE-style representation of Wicomico St. in Baltimore
- Control System: Digitrax DCC
Druthers
- Specific Industries to Model:
- Ellicott Engineering (Wicomico St.)
- GM Auto plant
- Brewery
- Coal Mine
- Coal Dock
- Paper Mill
- TOFC Ramp
- Interchange with at least one other railroad (in order of preference):
- Conrail
- N&W (yes, I'm taking some license with the timeline and the location)
- Wachusett & Erie (my original free-lanced road) - Phased construction
- Phase 1: Wicomico St module
- Phase 2: Black Lick Coal Branch
- Phase 3/4: Halethorpe Industrial Area
- Phase 3/4: Sparrow's Point Branch
[NOTE: I've added a Givens and Druthers page here, which will always contain the latest and greatest list.]
In an upcoming post I'll share with you my thoughts about modeling Wicomico St. as an "almost" LDE, the trackplan for the Wicomico St. industrial area, and the layout of the current space I have to work with, among other things.
Thanks for coming by!
Joe
Subscribe to:
Posts (Atom)